Since When i first learned about Tensorflow and also the promises of Deep Learning I’ve been anxious allow it a whirl.
Tensorflow is really a effective and simple to use library for machine learning. It had been open-sourced by Google in November 2015. In under 24 months it is probably the most popular projects on GitHub. I had been brought to Tensorflow in the O’Reilly Strata Data conference in San Jose this past year. Throughout a presentation by developer evangelists from Google I saw several really fun image processing examples that used Tensorflow to change or identify subjects in images. That presentation ended up being to this specific machine learning novice, nothing under jaw shedding.
“Any sufficiently advanced technologies are indistinguishable from magic”, Arthur C. Clarke.
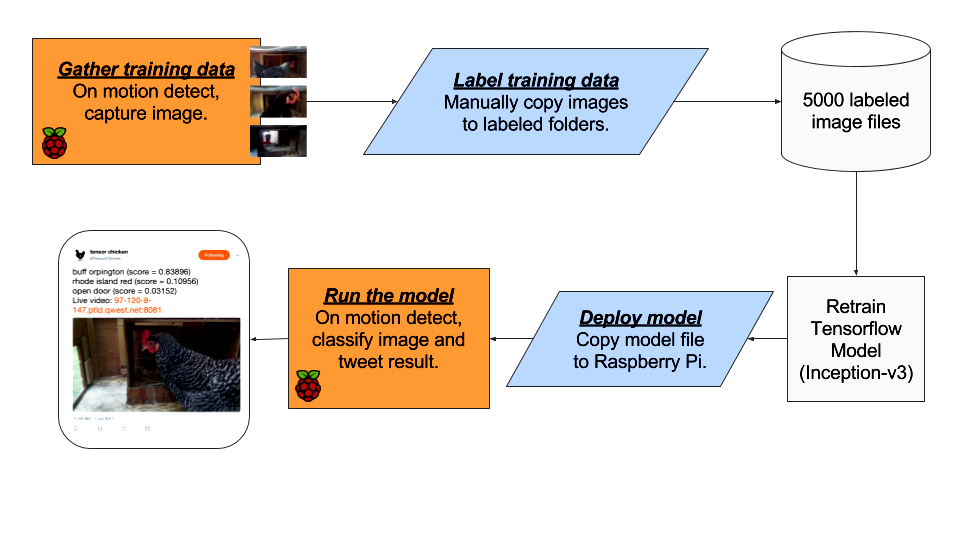
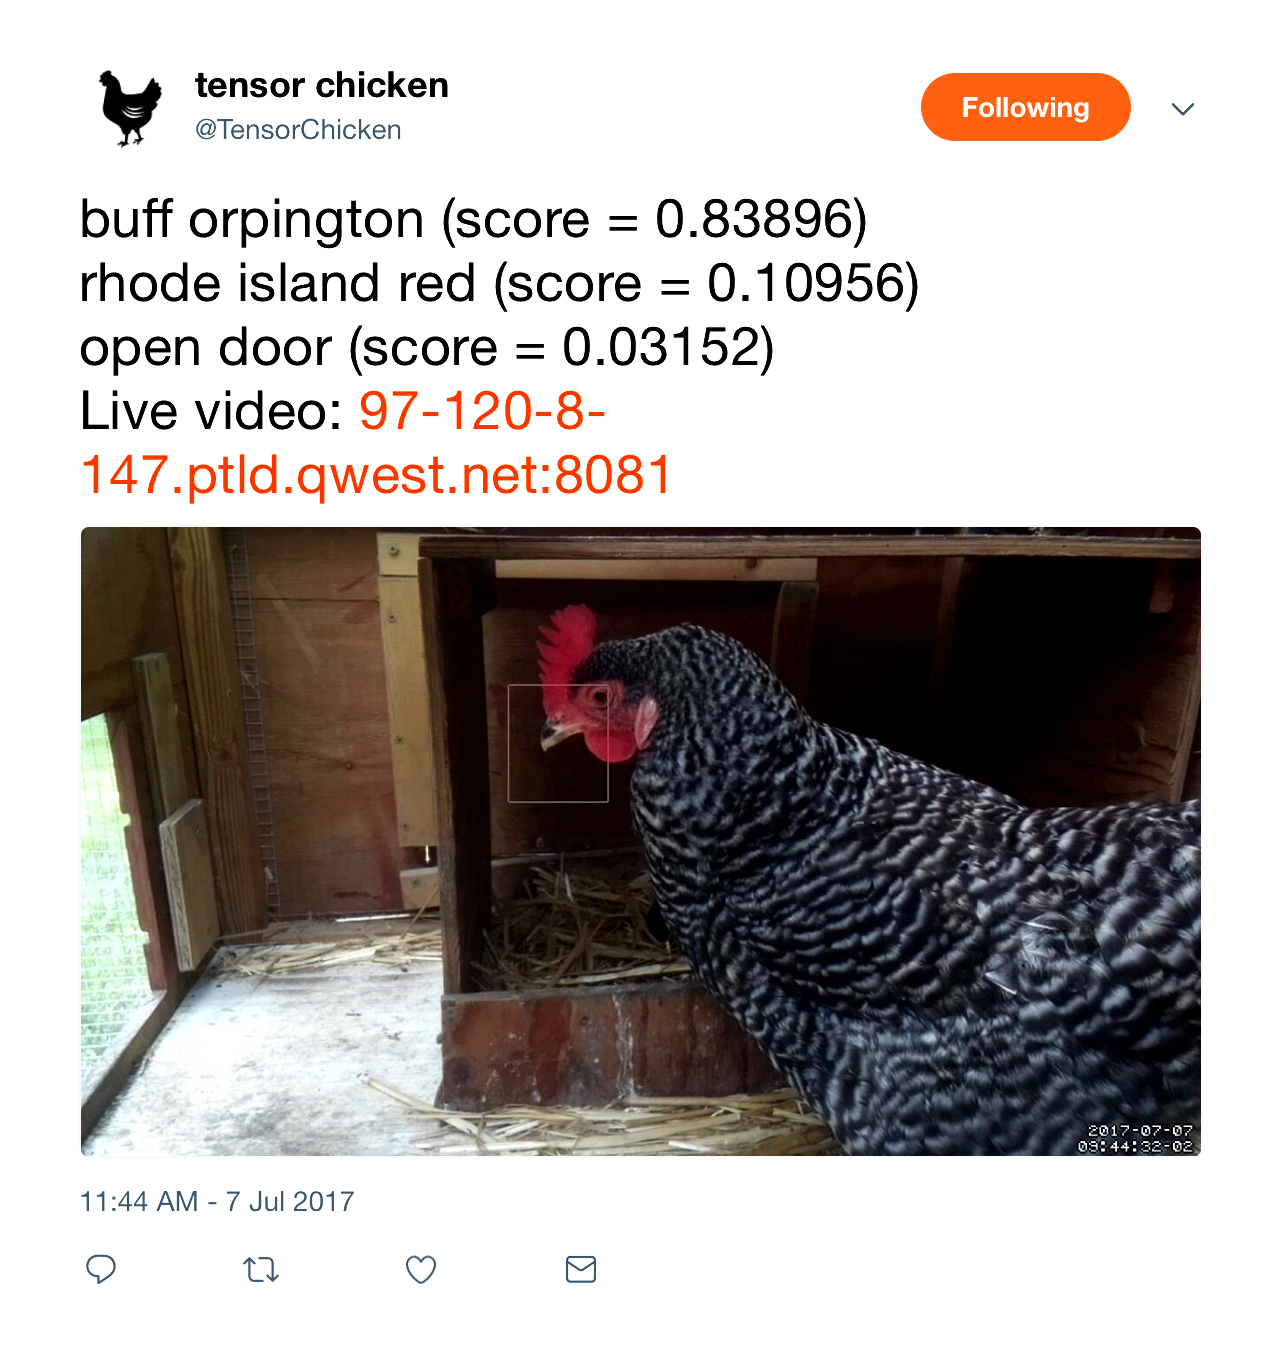
Go forward 6 several weeks and I’ve just deployed a Tensorflow application to my chicken house. It’s kind of an over-engineered make an effort to identify blue jays within my nesting box and chase them before they break my eggs. The application detects movement within the nesting box having a camera mounted on a Raspberry Pi, then identifies the moving creature utilizing an image classification model implemented in Tensorflow and posts that lead to @TensorChicken’s on Twitter.

The truth that I’m using Tensorflow on the Raspberry Pi is silly because it’s so frequently connected with applications that perform collosally large computations across countless servers. But Tensorflow is flexible and you can use it at scale, or otherwise.
How can you install Tensorflow on the Raspberry Pi?
Lengthy the days are gone where embedded computers were hard to use. Single-board computers such as the Raspberry Pi are suprisingly effective and functional with techniques which are familiar to the Linux mind. Ends up, it’s quite simple to set up Tensorflow around the Raspberry Pi. Listed here are the instructions I did previously install Tensorflow on my small Pi:
sudo apt-get update
sudo apt-get install python3-personal injury protection python3-dev
wget https://github.com/samjabrahams/tensorflow-on-raspberry-pi/releases/download/v1.1./tensorflow-1.1.-cp34-cp34m-linux_armv7l.whl
sudo pip3 install tensorflow-1.1.-cp34-cp34m-linux_armv7l.whl
sudo pip3 uninstall mock
sudo pip3 install mock
To learn more about installing Tensorflow around the Pi, check these out:
- https://github.com/samjabrahams/tensorflow-on-raspberry-pi
- https://codelabs.developers.google.com/codelabs/tensorflow-for-poets/#
- https://svds.com/tensorflow-image-recognition-raspberry-pi/
How can you identify motion and capture images from the Raspberry Pi webcam?
I setup a webcam on my small Pi having a nice lightweight application known as Motion. It really works with any Linux-supported camcorder and offers awesome features to capture images and films and trigger scripts when motion is detected. Your camera I’m using may be the Raspberry Pi Camera Module V2 – 8 Megapixel, 1080p.
Listed here are the instructions I ran around the Pi to put together the webcam:
sudo apt-get update
sudo apt-get upgrade
sudo apt-get remove libavcodec-extra-56 libavformat56 libavresample2 libavutil54
wget https://github.com/ccrisan/motioneye/wiki/precompiled/ffmpeg_3.1.1-1_armhf.deb
sudo dpkg -i ffmpeg_3.1.1-1_armhf.deb
sudo apt-get install curl libssl-dev libcurl4-openssl-dev libjpeg-dev libx264-142 libavcodec56 libavformat56 libmysqlclient18 libswscale3 libpq5
wget https://github.com/Motion-Project/motion/releases/download/release-4..1/pi_jessie_motion_4..1-1_armhf.deb
sudo dpkg -i pi_jessie_motion_4..1-1_armhf.deb
sudo mire /etc/motion/motion.conf
There are plenty of options within the motion.conf file. For the reference here’s my motion.conf file.
I additionally needed to add “bcm2835-v4l2” to /etc/modules. Then following a reboot the webcam made an appearance on Motion’s built-in HTTP server on port 8081 (for instance: http://10.1.1.2:8081).
To learn more about establishing a Raspberry Pi webcam server, take a look at https://pimylifeup.com/raspberry-pi-webcam-server/.
Building the Tensorflow model
My Tensorflow image classification model comes from the Beginning-v3 model. This model can be simply retrained to acknowledge categories of new images. I copied about 5000 images taken through the Motion plan to my laptop and by hand saved them in directories named based on the groups I supposed to have been utilized as their label. For instance, all of the pictures of a clear nest were held in a directory known as, empty_nest. I additionally saved all of the label names inside a plain text file known as retrained_labels-chickens.txt.
To include my custom labels in to the Beginning-v3 model I ran the next command. This required about half an hour to accomplish on my small laptop.
python re-train.py –bottleneck_dir=bottlenecks-chickens –how_many_training_steps=500 –model_dir=beginning –summaries_dir=training_summaries-chickens/fundamental –output_graph=retrained_graph-chickens.pb –output_labels=retrained_labels-chickens.txt –image_dir=chicken_photos
Here’s a great reference for being familiar with what that command does and it is options mean:
https://www.tensorflow.org/tutorials/image_retraining
Testing the model
To check the model, I ran instructions such as the following someone to verify it created sensible labels for pictures of my nesting box:
python3 /home/pi/tf_files/label_image-chickens.py test_image.png
Here’s my label_image-chickens.py script.
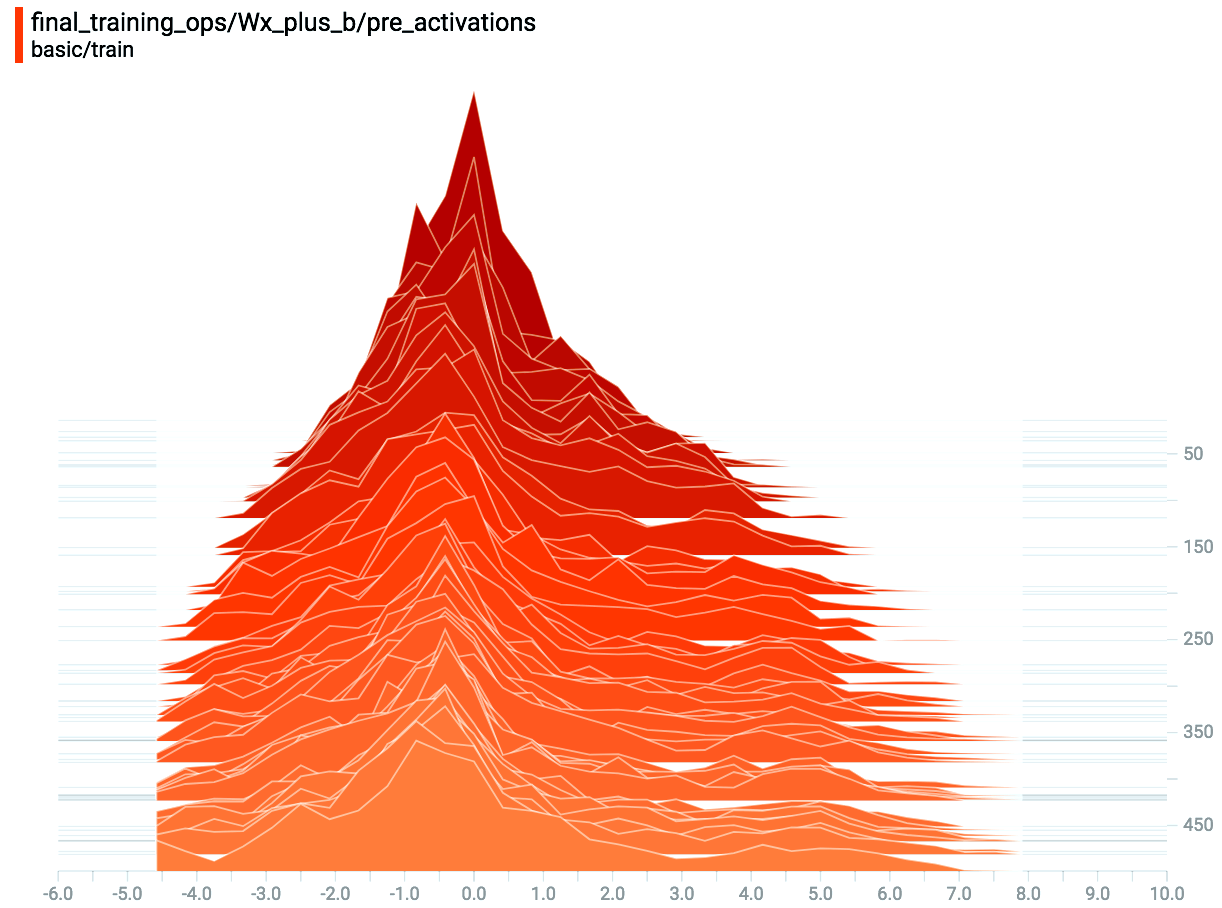
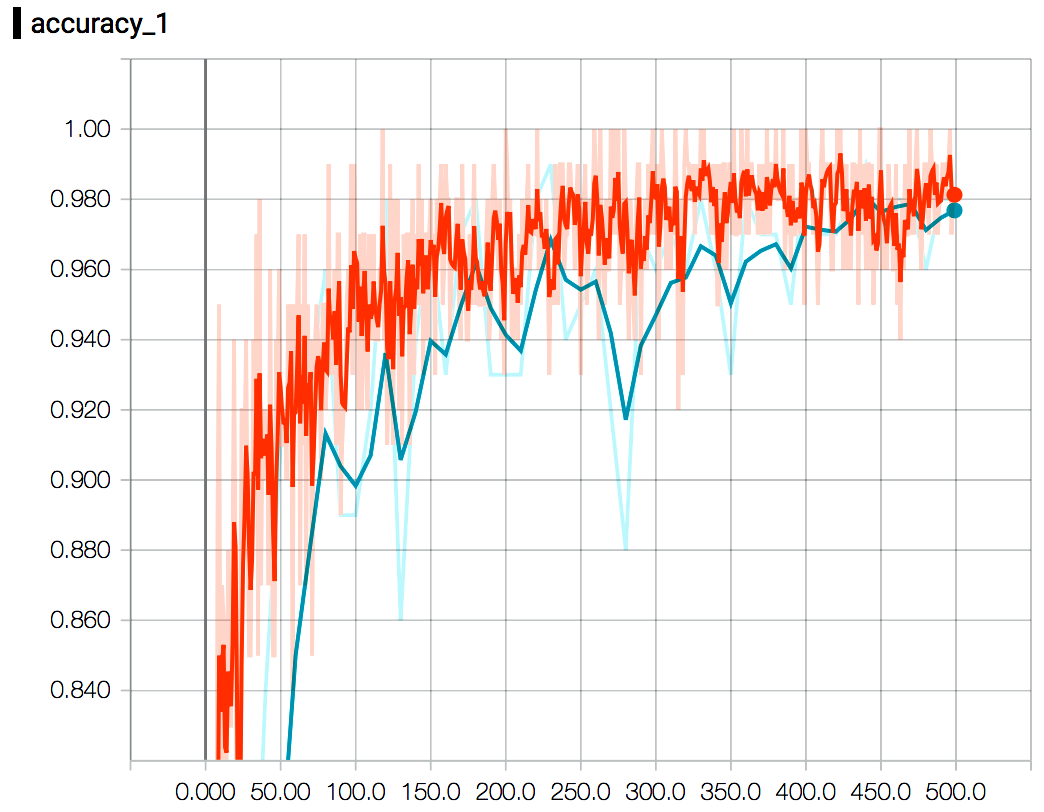
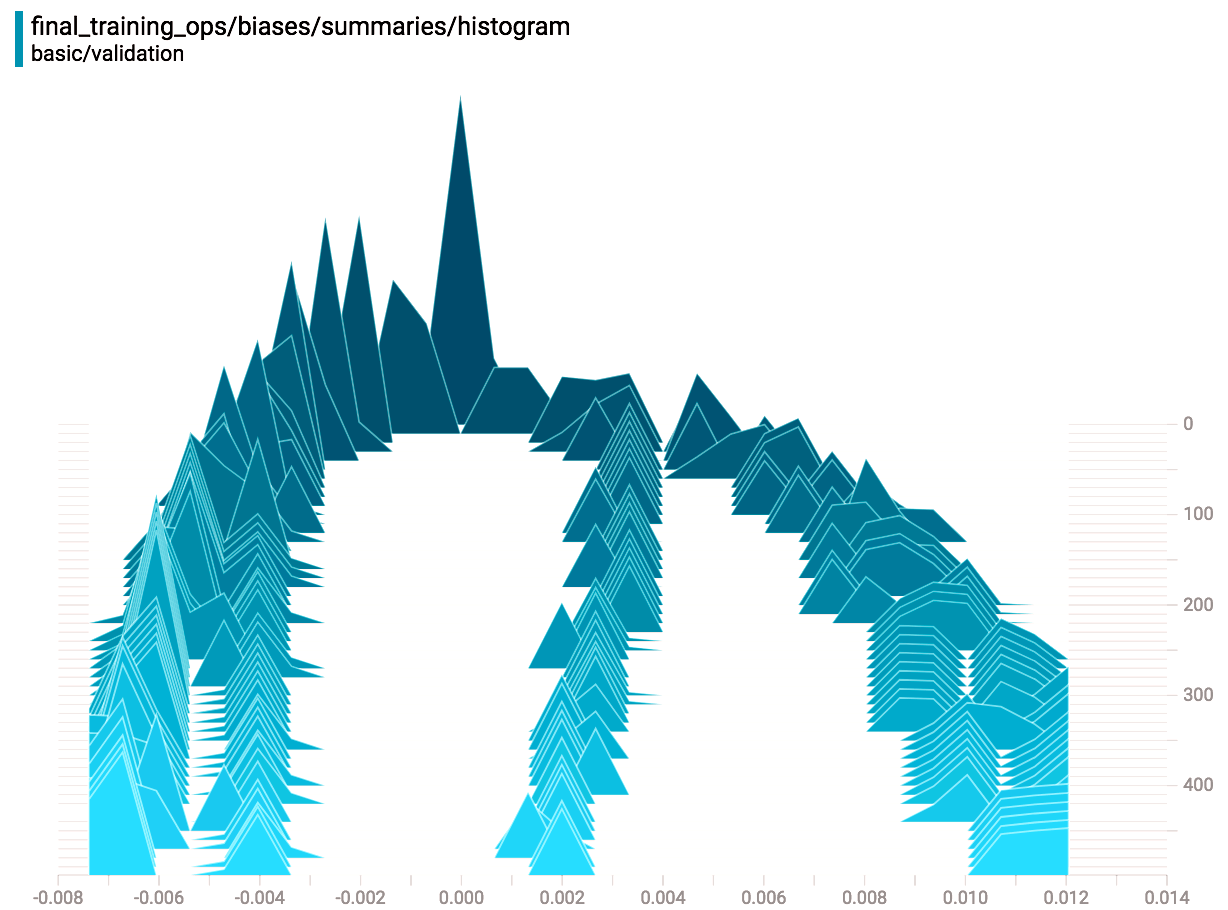
Analyzing the model with Tensorboard
The re-train.py script outputs model performance data that may be examined in Tensorboard, which may be really helpful to assist know how your model works (from the neurel network perspective) and just how precisely your model makes predictions. However , I love Tensorboard most since it makes charts that really help me enhance blog entries:
Running the application
The model I generated in the last step was found in personal files about 84 MBs large. Tensorflow models could be compressed consider the Raspberry Pi is really effective I simply left it as being-is. When the model file retrained_graph-chickens.pb was copied towards the Pi I automated image classification by invoking the next party script from among the “on_motion_detect” qualities defined moving.conf. This script could be run instantly via Motion or by hand in the covering.
#!/bin/party
sntp -s time.google.com
sleep 5
find /home/pi/motion/ -type f -name "*`date +’%Y%m%d’`*.digital" sort tail -n 1 while read line do
date
echo "Tweeting file ‘$line’"
CLASSIFICATION=`python3 /home/pi/tf_files/label_image-chickens.py $line mind -n 3`
PUBLICIP=`curl -s ifconfig.co tr ‘.’ ‘-‘`
MESSAGE=`echo -e "$nLive video: $.ptld.qwest.internet:8081"`
MEDIA_ID=`twurl -H upload.twitter.com -X Publish "/1.1/media/upload.json" –file $line –file-field "media" jq -r ‘.media_id_string’`
twurl "/1.1/statuses/update.json?tweet_mode=extended" -d "media_ids=$MEDIA_ID&status=$MESSAGE"
done
The above mentioned script transmits tweets having a utility known as twurl. To set up it’ just ran sudo jewel install twurl. Additionally, it mandates that you develop an application on https://apps.twitter.com/ and authorize access via keys defined in ~/.twurlrc. See twurl docs to learn more.
Here’s how everything fits together:
Thinking beyond APIs, do you know the challenges with Deep Learning for business?
This application wasn’t very difficult to build. Tensorflow, motion recognition, and automatic tweeting are stuff you can fix pretty easily, but things change by trying to deploy on the bigger scale.
Make a high-tech chicken farm where potentially countless chickens are continuously monitored by smart cameras searching for predators, animal sicknesses, along with other ecological threats. In scenarios such as this, you’ll rapidly encounter challenges coping with the enormity of raw data. You shouldn’t discard old data because you will need it to be able to re-train future models. Not just will it be difficult to reliably archive image data but it is also difficult to apply metadata to every image and save that information inside a searchable database. There are more challenges too:
- How can you cope with the enormity of raw data streams?
- How can you reliably archive raw data making it searchable?
- Where would you run computationally difficult Machine Learning workloads?
- While you re-train and improve Tensorflow models, how can you do version control along with aOrW testing?
These challenges are often experienced by individuals attempting to operationalize applications which use machine learning and large Data being produced. Like every self respecting wizard you can test to find this stuff out yourself, but there will be a place where you’ll end up wanting stuff that are outdoors the scope associated with a machine learning API. That’s whenever you become my personal favorite person to speak to!

At MapR, we sell a Converged Data Platform that is made to improve how information is managed and just how applications access data. People like MapR because we offer better security, simpler management, greater resiliance to failure, and faster performance than every other Big Data platform. A credit card applicatoin running on MapR has immediate access to data kept in files, tables, or streams. That data may include:
- structured and unstructured data,
- data in cold storage and real-time data in streams,
- and knowledge on-premise, data within the cloud, or data in the IoT edge.
MapR integrates key technologies, together with a vast Big Data filesystem, a NoSQL database, along with a distributed streaming engine into its patented Converged Data Platform. MapR uses open APIs for example HDFS, HBase, Kafka, POSIX, and NFS since it allows users to harness the strength of MapR’s underlying platform.
So the next time you’re intending to deploy Big Data infrastructure or intelligent applications, get in touch and lets talk shop!
Conclusion
The science and math behind the Deep Learning is mindbogglingly sophisticated but Tensorflow makes it approachable by novice software programmers for example myself. It’s crazy to consider that just a couple of years back a picture classification application like I designed for my chicken house were unheard-of since the APIs for neurel systems simply weren’t advanced enough.
It’s well-known that people advance technology by sitting on shoulders of giants so that as I watch tweets flow into @TensorChicken I can’t help but think about the centuries of labor that has lead a few of the smartest people in our time to evolve Deep Understanding how to where it’s today.
Tensorflow was open-sourced by Google in 2015. In under 24 months it is probably the most popular projects on GitHub. It’s API is straightforward, it’s abilities are vast, and it is based on a separate and growing community of developers attempting to improve it. I believe Tensorflow is actually likely to benefit humanity – and my chickens – greatly.
Please provide your feedback for this article with the addition of a remark to https://github.com/iandow/iandow.github.io/issues/4.
Resourse: http://bigendiandata.com/2017-07-12-Tensor_Chicken/
Ryan Zotti | How to Build Your Own Self Driving Toy Car
Chicken coop plans manual | Related Posts:

Tags: chicken, raspberry, tensorflow, using
Comments are closed here.